


MAKING A RFID CARD READER WITH ARDUINO YÚN

Surya Mattu is a creative technologist who loves to make things. He’s based in NYC and working at ITP, a two-year graduate program exploring the imaginative use of communications technologies. Today he’s sharing with us how feasible it could be to build an RFID-controlled entry for students using Arduino Yún. Read other guest posts on Arduino Yún.
————————
I work at ITP as the student floor-staff programmer. At the start of the semester I was asked to set-up a system to allow students entry to the ITP floor from the fire escape using their university cards. Although this is something that would normally fall under the NYU IT departments domain its a long and arduous process involving lots of different departments so we decided to go with something that was developed in-house.
Although this is a relatively simple task it has a few steps that can be clunky. The objective was to design a simple solution that doesn’t require much maintenance.
Things that we kept in mind while designing the system:
Card Reader: It was necessary to use the standard card reader used by NYU as it was part of the policy requirements. Luckily I managed to get my hands on this and wrote a little Arduino library to help decode the incoming data. Its available here.
Ensure its secure: We wanted to ensure that student and staff personal information would not be exposed to allow them access. The system needed to have the minimum information necessary to allow the right users access. This basically meant using just the cards RFID number and exposing no other data about the user.
Keep it simple: It was necessary to make a system that would be easy to hand-off to someone else once I graduated.
Minimise network interaction: Since this door was to allow access to students and staff at all times it couldn’t go down if the network went down for maintenance or any other reason
Before this project started I was fortunate enough to get my hands on anArduino Yún from Zoe. I had been playing around with it for a while and felt this application was really well suited to what the Yún can do.
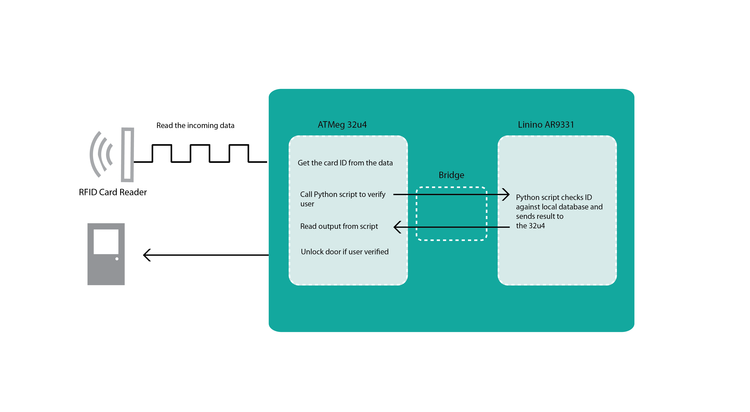
Something that I’ve found particularly exciting about the Yún is the Bridge. The Bridge allows the 32u4 (the microcontroller) to talk to the Linino (Linux) chip straight from the .ino sketch!
Also, the Linino chip comes with a full implementation of Python which means you can do things like text parsing and web scraping and integrate it with your Arduino in a really seamless way straight from your sketch.
So the components we needed to use were pretty few.
HID Multiclass RFID card reader
Arduino Yún as it matched our requirements perfectly
Electromagnetic mechanism for unlocking the door from a button press that was already in place.
This was the system we came up with for this application:
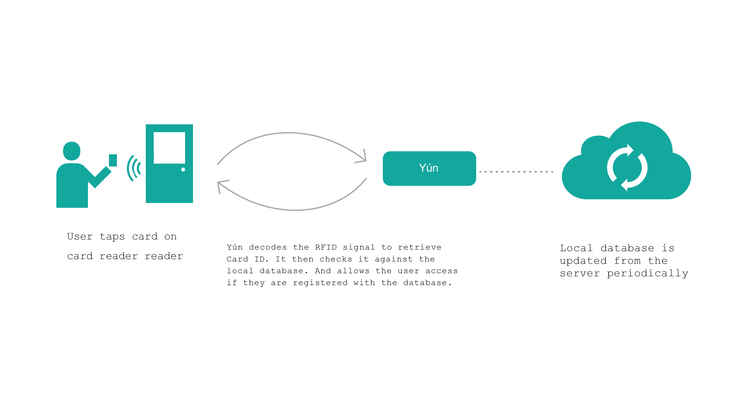
The great thing about using the Yún is that it has Python on board. It was really easy to write a script that periodically got a JSON dump of the card ID information for all the persons who needed access to the floor. Because it was possible to do a periodic dump so easily we set up an API from the main database that only provided card IDs that had access rights and no other information. This meant that no student or staff personal information was exposed.
A more detailed description of the system:
The above figure describes the user interaction with the system. Along with this there is another script that runs periodically on the board to update the local database.
The door unlocking mechanism already in place. It used a button that someone could manually press to unlock the door. We used a relay instead of a switch to control it from the Arduino.
The video below shows the card reader in action. With two LEDs replacing the relays. Red if access is denied and green if approved.
Using the Yún for this project made it possible to write a few small pieces of simple code in different languages rather than one big complicated program. I personally prefer this approach as it makes it easier to test, understand and explain the system.
The code for this application is available here


0 comentarios:
Publicar un comentario