"MAKING SPACES TALK" WORKSHOP @ MAIND [SUPSI] SWITZERLAND
– May 11th, 2010

[Massimo] is teaching at the end of May at the SUPSI (Scuola Universitaria Professionale Svizzera Italiana) for a master in Physical Computing.
The evolution of sensing and networking technologies allowed a paradigmatic change in the conception of our environment: sensible physical objects, physically interconnected, turn spaces into something smarter and active by interpreting our needs and influencing our behavior. Making spaces talk is a workshop focused on the design of prototypes of interactive environments based on hardware/software systems that perceive, interpret, and react to the real world by providing the user with information or metaphorical, visual, and tangible experiences.
THREE WAYS TO POWER AN ARDUINO OFF-GRID
– May 11th, 2010
[Jeff Crystal] on Voltaic Systems tells us three innovative ways to to power up arduino:
Direct to a Solar Panel – We plugged our 2.0 Watt, 6Volt panel into the Arduino’s 5.5mm x 2.1mm DC Jack via our Generator Circuit Box. On a hazy day and through a screen, it lowered the basic blink application. Of course, this will only work when there is sunlight and your application can work with extended downtime. The circuit box set has two outs so you can send power to another part of your application if needed. The panel is also available from Adafruit.

A 5Volt Battery with a USB Port – There are a number of battery packs out there with an integrated USB port. Our 3,000mAh Battery Pack V11 connects to the Arduino via a USB A/B Cable. The major downside is that there is a one hour shut-off in our battery if the load is drawing less than 50mA. This is great for preserving battery life in the pack but not great if you need to run the Arduino for over an hour. You can restart the battery by pressing the Power Button.

Solar & Battery Hybrid – We were pointed towards these Tenergy Lithium-Ion Cells (3.7V 2600mAh) and this smart battery case (puts two Li-Ion 3.7V cells in series) by office neighbors Breakfast NY. We connected three of our 10Volt panels in Parallel with our Generator circuit box (As an alternative, you could wire two of our 2.0 Watt, 6Volt panels in series to charge this configuration), connected the circuit box to the Arduino’s DC Jack, then connected the second out from the circuit box to the 2 Li-Ion cells. The circuit box has a blocking diode which prevents power from draining from the batteries into the panel. When the sun goes down or is obscured by clouds, the batteries will kick in and provide power to the Arduino. When the sun is up, excess power goes into the batteries for later. Both the batteries and the battery case have built-in protections against overcharge and short circuit which simplifies the amount of supporting circuitry you need to do.


via [Adafruit] source [VoltaicSystem]
VOTE FOR ARDUINO! [ENGLISH SUBTITLED VIDEO PROVIDED!]
– May 10th, 2010
You have probably read this blog post from [dcuartielles] talking about “Italia degli Innovatori” project.
The Italian government is making a selection of national innovations to bring to Shanghai’s Expo this year. There have been many entries, among them ours, and now Wired Italy is conducting an online poll to decide which will be the chosen ones to be present at the Expo. Representing Arduino, Massimo submitted an entry in the name of Smartprojects, the company manufacturing Arduino USB and Arduino Mega, as well as a bunch of the official shields. The whole campaign is in Italian, and therefore it is pretty hard for the non-Italian speakers to even get to know this is happening.
Since I taped the interview some time ago, I chose to upload it on our youtube channel, with english subtitles.
Remember that this interview was shot to explain Arduino to an italian audience that used to ignore it. Massimo is one of the most modest person I know, and reading throught the subtitles I could feel the inner differences among english and italian.
Tell us what you think and – overall – vote!
via [arduinoBlog]
ARDUINO BADGES
– May 10th, 2010


[davidCuartuelles] compares two different arduino badges: the ladyada’s arduino Uno meeting ones and the MultilogicaShop badges . And shows us.
VOTE FOR ARDUINO
– May 9th, 2010
The Italian government is making a selection of national innovations to bring to Shanghai’s Expo this year. There have been many entries, among them ours, and now Wired Italy is conducting an online poll to decide which will be the chosen ones to be present at the Expo. Representing Arduino, Massimo submitted an entry in the name of Smartprojects, the company manufacturing Arduino USB and Arduino Mega, as well as a bunch of the official shields. The whole campaign is in Italian, and therefore it is pretty hard for the non-Italian speakers to even get to know this is happening.
This is a call for you all to Vote for Arduino, if you are happy with the platform, if you enjoy learning and building with us, if you like it and if you like us, you can help us out getting more visibility in front of the world by visiting thefollowing website and clicking on the five-starts rating system on top of the page. Please, go straight for the 5th star, we need all the help in the world to be one of the chosen ones.
As a thank you, here you get a video of Massimo explaining in Italian why Arduino should be representing Italy at the Expo:
UPDATE 20100510: not even 24 hours after the announcement on the blog, we are already second, guys thanks a lot for voting for us, we just need a couple of hundred more votes to make it to the first place!
UPDATE 20100510_2: Davide Gomba from Tinker.it! subtitled the movie with Massimo, for those of you wondering what he was saying in it 
El gobierno Italiano está haciendo una selección de innovaciones nacionales que traer a la exposición de Shanghai de este año. Hay muchas entidades participantes, entre otras la nuestra. Wired Italia es el responsable de estudiar que candidatos son los mejores en función de una votación online. Representado a Arduino, Massimo envió una solicitud en el nombre de Smartprojects, la empresa que fabrica Arduino USB y Arduino Mega, así como una serie de los shields oficiales. Toda la campaña es en Italiano, y puede resultar difícil de comprender si no se habla la lengua.
Este post es una llamada para que Voteis por Arduino. Si la plataforma responde a tus expectativas, si disfrutas aprendiendo y construyendo con nosotros, si te gusta y te gustamos, nos puedes ayudar a conseguir más visibilidad en todo el mundo visitando esta web y clickeando sobre las cinco estrellas del sistema de votación al principio de la página. Por favor, ve directo a por la 5a estrella, necesitamos toda la ayuda del mundo para ser elegidos.
Ahí va un vídeo de Massimo explicando porqué Arduino debiera ser elegido:
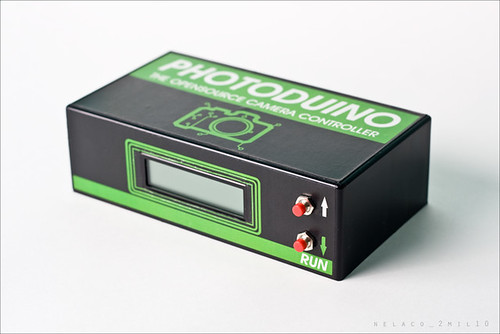
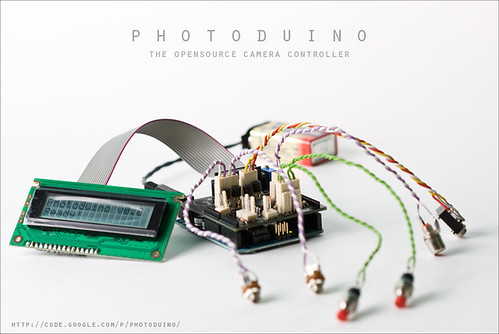
PHOTODUINO: CUSTOM CAMERA-COTROLLER SHIELD
– May 8th, 2010
BADGES, BADGES, BADGES
– May 7th, 2010
During the Arduino Uno meeting, we were invited to visit Adafruit’s headquartes in Manhattan. We got to see where Limor spends her time answering the forums, her pick and place machine, the shelves filled up with nicely packaged kits, the view to the street (yes they have a view) and we all got some Arduino badges as a present. I felt like back in the boy-scout days and imagined putting them on top of my lab-coat. Just to scare my work mates at the art school even more 
This design is made with the shape of the -now- traditional USB board. I still remember the face people made when I presented the weirdly shaped-blue board for the first time. I would like to collect all the boards having this shape in the world and publish a book about it with the title “one shape to control them all”.
This week I got a note from the Swedish postal service kindly inviting me to go to the strangest post office in town. So strange it is not even in town. After a 9Eur taxi ride I made it to the central that processes all the post coming to Malmo just to sign for a letter that had my name misspelled on it. I opened it to find the MultilogicaShop badges coming out. This is manufactured in Brazil and is about 6.5cm big. It feels good to get some of this Arduino gear as a reward for having to ride a cab that far.
The badge is made using the original design by Thomas Gläser that we are using for Arduino 18.
Update 20100509: I have to add that I was rising my voice not against Multilogica, it is pretty easy to misspell my family name, not even government officials in Spain know how to write it. My complaint was towards the Swedish postal service that brings packages for me to my studio 4 days out of 5 every week and they are still not getting that David Cuertielles, David Quartielles, Davit Kuartieles, etc are the very same person 
ARDUINO EMAIL MANAGER [3 PART TUTORIAL]
– May 7th, 2010
[Torchris] comes back from a little pause with a nice step by step tutorial on a mail receiver.
I will post the software in subsequent entries, but for now I will just explain that I decided to go with using a mail “pre-processor” application written in PHP. Originally I wanted to do everything on the Arduino so it would be a complete, stand-alone solution, but, alas, it just proved to be too hard for the Arduino’s limited text processing abilities and my small brain. Basically, even with the Duemilanova based on the ATMEGA328, you really can’t load a string array with more than a couple of hundred characters before the Arduino locks up. Unfortunately, you need to look through at least the first 1,500 – 2,000 characters to get the “from” and “subject” info I wanted. I looking into usingPROGMEM, but I just couldn’t get my head around it (looks like all that fancy “pointer” stuff I can never figure out!). Then there’s the Arduiniana Flash library, but it seems limited to strings you load at the beginning, rather than dynamic strings.Finally, I just decided to go with a pre-processor written in PHP. I already know enough PHP to be functional and it is excellent for text processing. When I went to figure out how to do sockets programming with PHP, the first tutorial I found was on writing a script to access a POP3 email server (check it out)! Using a pre-processor isn’t cheating too much. Tom Igoe uses one in Making Things Talk for his “Networked Air Quality Meter” project. Of course, on a much vaster scale, that is essentially how the RIM Blackberry email system works – emails are routed through their preprocessor software which compresses and reroutes them them down to the smartphone.
video and links after the break
ARCHITECTS CAN DRAW FOR SURE
– May 6th, 2010
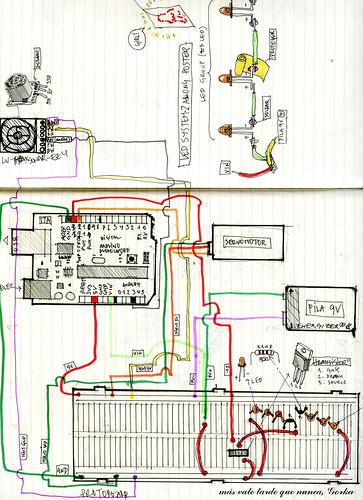
This is an illustration that I loved from Gorka’s notebook, one of the attendants to my latest interactive architecture workshop at Basque Country University in San Sebastian. He just scanned it and sent it to me. I hope you will enjoy it as much as I do.
INTERVALUINO, TIME-LAPSE LOVERS TOOL
– May 6th, 2010

If you have to chance to test it, give it a try. One of the most useful uses of arduino turning a common camera in a cinema tool.
I call it Intervaluino, and it does exactly what I want him to do: Tell my Canon EOS 400D to take pictures at regular intervals. Wanna build one yourself? Please follow me.

you’ll need:
- 1 Arduino (I used the Diecimila model) -
- 3x 100 ohm resistors
- 1x 10k ohm resistor
- 2 x 5V reed relays (NO = normally open)
- 1 x push button of your choosing
- 1 x 2.5mm male stereo jack
- 1 x 80 x 50 mm strip board
(alternatively: bread board or Arduino protoshield) - Assorted wires
- Arduino USB cable
- Arduino AC adapter OR Arduino 9V battery pack
- Basic electronic tools to cut and de-isolate wires and to solder components (if you use a strip board), maybe a multimeter to test connections
- A nice box
- 20 cm of thin steel cable (used as a loop to attach the Intervaluino to the tripod)


0 comentarios:
Publicar un comentario